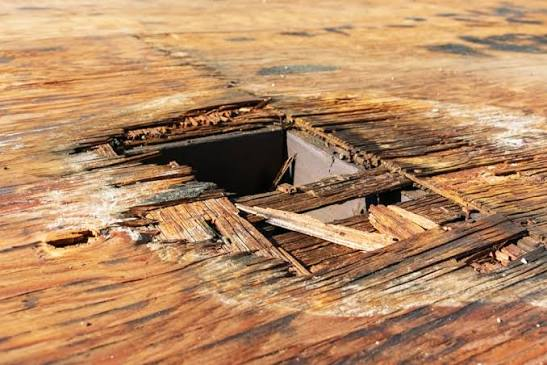
A roof can look tidy from the street while the wood underneath is quietly getting wet. Sometimes the first clue is a dark patch in the attic. Sometimes it is a slight dip near the eave, a soft section discovered during a repair, or a ceiling stain that returns after every wind-driven rain. Roof decking rot means the structural wood beneath the roof covering has deteriorated after prolonged moisture exposure. It is not the same as a surface stain, and it cannot be fixed by laying new shingles over damaged wood.
The useful question is not merely whether the deck looks dark. It is where water is coming from, how long the area has stayed wet, whether the wood still holds fasteners, and how far the damage extends. Those answers determine whether a localized repair is enough or a wider section of the roof needs to be opened.
Know which part of the roof you are actually looking at
Roof decking, also called sheathing, is the layer of plywood, oriented strand board, or older wood planks fastened to rafters or trusses. Underlayment sits above it, followed by shingles or another roof covering. The deck gives fasteners a sound base and helps distribute loads through the roof framing.
In an unfinished attic, you may see the underside of those panels between the rafters. Dark lines along panel edges, water streaks near penetrations, and flaking wood are reasons to investigate, but color alone is not a reliable test of structural strength.
During a roof replacement, the condition of the deck matters as much as the new shingle choice. The Asphalt Roofing Manufacturers Association’s reroofing guidance says rotted or warped wood must be addressed before new roofing is applied. A beautiful top layer cannot compensate for a failing base.
The difference between a water stain and decayed wood
Old staining can remain after a leak has been fixed. Dry wood may look discolored yet still be structurally sound. By contrast, active deterioration may show softened fibers, crumbling edges, delamination, or an area that no longer supports fasteners as intended.
Do not jab a screwdriver into roof panels to “prove” rot, particularly from an unstable attic position. That can enlarge a weak area and create a fall risk. A qualified roofer or building professional can assess moisture, firmness, panel condition, and the surrounding structure using appropriate methods.
Fresh staining after rain suggests an active water pathway; a dry old mark with no change may have a different story. Compare dated photographs and ask for moisture readings where accessible. The diagnosis should explain both the visible condition and the likely cause.
Where roof decking rot most often starts
Water concentrates at transitions. Valleys collect runoff from two slopes; chimneys and vents interrupt the roof covering; eaves sit near gutters and ice; and roof-to-wall joints depend on careful flashing. A small opening in any of these locations can wet a surprisingly broad area below.
Our guide to roof valley leaks explains how leaves, worn flashing, and drainage details can direct water beneath shingles. When an attic stain sits below a valley, a roofer should trace the water path rather than replacing the nearest shingle at random.
In cold regions, ice dams may push water beneath roof coverings near the eaves. If winter is part of the pattern, read our ice dam prevention guide before assuming the solution is simply more sealant at the edge.
Not every wet roof deck has a roof leak
Moist indoor air can reach a cold roof deck through ceiling gaps and condense on the wood. Bathroom fans vented into attics, unsealed attic hatches, blocked ventilation paths, and unusual indoor humidity can all complicate the moisture picture. In some roof assemblies, ventilation and vapor-control details are deliberately different, so blanket advice is risky.
A wet pattern spread across many cold panels may suggest condensation rather than one isolated penetration. A localized stain that grows immediately after rain points toward bulk water entry. Neither rule is absolute; a professional should consider the climate, roof design, and timing.
The APA Engineered Wood Association’s moisture guidance emphasizes that sheathing, flashing, underlayment, and ventilation work together. Fixing only the visible wood while leaving the moisture source in place invites a repeat problem.
Read the shape of the damage
A dark stripe below a plumbing vent can trace runoff from a failed boot. A broad band at the eaves may involve gutter overflow or ice backup. Panel-edge swelling can follow repeated wetting, while a dip across rafters may signal more than a sheathing issue.
Ask the inspector to map the affected area onto the roof plan. Marking “north slope, three feet below vent” is much more useful than “bad plywood.” It helps you compare photographs, estimates, and the actual section opened during repair.
Remember that water may run along a rafter before dropping onto insulation. The wettest insulation is not always directly under the roof opening. Tracing the path matters more than guessing from the ceiling stain.
Why roof sagging needs a different level of attention
A subtle ripple in shingles can come from underlayment wrinkles or normal panel movement. A noticeable dip between supports, a sagging ridge, or changes in the shape of framing deserve a more urgent structural evaluation. These are not defects to disguise with extra shingles.
Stay out of any attic area with visible deformation, cracked framing, or signs of imminent failure. Avoid walking on the roof to investigate. A licensed structural engineer may be needed when the condition extends beyond surface sheathing into rafters, trusses, or connections.
Ask whether the proposed work repairs only panels or also addresses underlying supports. The answer affects permits, cost, timing, and whether the house can remain occupied during work.
What a sound repair sequence looks like
First the source of water must be identified and stopped. Then the roofer opens the roof covering as needed to inspect the affected deck. Unsound sheathing is removed and replaced with suitable material, thickness, fastening, and spacing for the roof system and local code. Underlayment and flashing are restored before the roof covering goes back on.
That order matters. Covering damp, deteriorated wood can hide the problem without restoring strength. A patch that ignores flashing may be dry on installation day and wet again after the next storm.
Request photographs before removal, after the damaged material is exposed, and after replacement. These images document what was found and help explain any change to the original estimate.
How much decking needs replacement?
There is no honest universal number of panels to replace based on one attic photograph. Damage can be confined to a small area around a vent or spread across several bays. The boundary should follow sound material and framing support, not an arbitrary square-foot allowance.
Ask the contractor to describe the criteria for keeping a panel: moisture condition, integrity, edge support, and fastener retention. Some panels may be stained yet serviceable; others may be visibly deteriorated. The distinction should be documented.
If a roofer proposes replacing every panel, request a clear explanation. If a contractor proposes covering visibly rotted wood, that is a warning sign. A second opinion can be valuable when the scope differs sharply between bids.
Plan for hidden conditions in the estimate
Roofing crews cannot always know the full extent of deck damage until the old covering comes off. A good contract explains how unforeseen sheathing replacement will be priced, who authorizes additional work, and how many panels are included in the base bid.
Compare the unit price for additional plywood or OSB, disposal charges, labor, and any framing repair separately. Ask whether local code requires a permit or inspection for the planned scope. Transparent allowances are better than a suspiciously low bid followed by surprise charges.
For a small leak repair, ask how the crew will integrate the new underlayment with the existing roof. For a full reroof, review ventilation, flashing, and ice-barrier details at the same time. These details determine whether the new deck stays dry.
What homeowners can check without taking risks
From the living space, note new ceiling stains, peeling paint, musty odors, and recurring damp spots. From a safe, stable attic walkway, if one exists, look for water streaks and changes in the wood without touching wiring or stepping between framing members.
Do not move through loose insulation if you cannot see the joists, and do not enter an attic after major storm damage if the structure may be compromised. Use ground-level photographs of roof dips, damaged gutters, and missing shingles to supplement the interior record.
A simple moisture log helps: date, weather, room affected, whether the stain expanded, and who inspected it. It also prevents a familiar problem from being dismissed as “probably old” after the evidence dries.
How to prevent a second round of damage
Keep gutters and downspouts functioning, have penetrations and flashing inspected when roofing work is done, and address indoor humidity or improper exhaust routing. Prevention is less about coating every seam with sealant and more about preserving a continuous path that directs water outward.
Schedule roof checks after severe weather and whenever you notice a new stain. Avoid routine pressure washing or foot traffic on fragile shingles. If your attic has an unusual vented or unvented design, consult someone familiar with that assembly before changing insulation or ventilation.
When the roof is being replaced, ask to see the deck before it disappears beneath underlayment. It is one of the few moments when hidden conditions are easy to document and correct.
Final thoughts: repair the cause, then the wood
Roof decking rot is a moisture story before it is a lumber story. The repair only lasts when the leak or condensation problem is understood, unsound material is replaced, and the new roof layers shed water properly.
A clear inspection, photographs, and a written scope make this less mysterious. The goal is not to replace the most wood. It is to leave sound structure beneath a roof that can handle the next season of weather.
