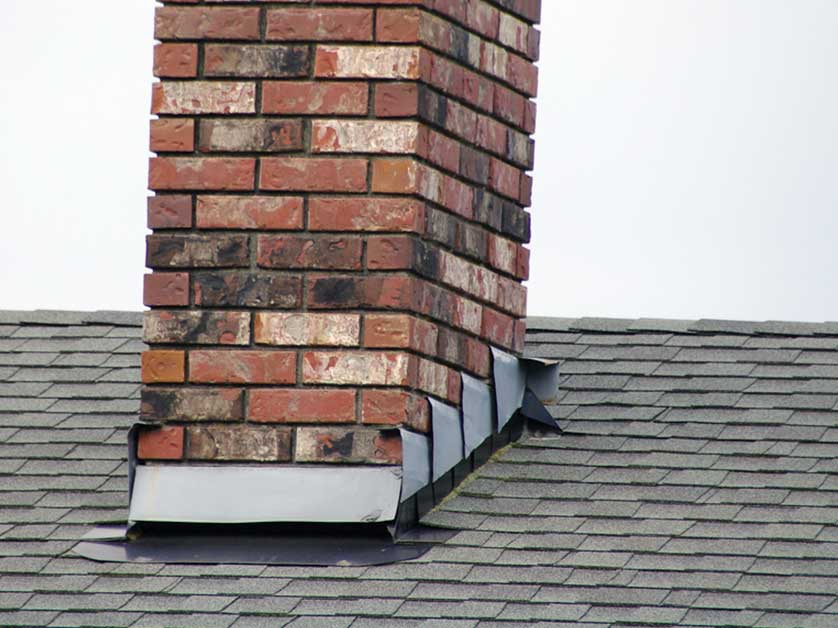
A brown stain on the ceiling beside a fireplace can send a homeowner straight to the shingles. Yet the weak point may be where the roof meets the chimney, not the roof covering itself. A chimney flashing leak happens when water gets past the metal pieces designed to bridge that joint. The right repair depends on whether the problem is loose counterflashing, damaged step flashing, cracked masonry, or water collecting behind the chimney.
The useful first step is to document when the stain appears and where it sits, then have the entire chimney-to-roof junction examined. Replacing a few nearby shingles without understanding the water path can leave the leak untouched. Here is how to read the clues, understand a contractor’s proposal, and decide whether a focused repair or a larger flashing rebuild makes sense.
Why this joint is more complicated than it looks
A chimney does not move exactly like the roof around it. Masonry, framing, roof decking, and metal expand and settle differently. Rain also travels downhill along several surfaces before it finds a small opening. A sound flashing assembly manages that movement with overlapping metal pieces rather than depending on a line of caulk to stay watertight forever.
Along the chimney sides, individual pieces of step flashing usually interleave with shingle courses. Counterflashing overlaps those pieces and is secured to the masonry. At the uphill back, a back pan or a small peaked cricket redirects runoff. At the downhill face, an apron flashing guides water onto the shingles. Each piece has a different job; asking which piece failed is much more useful than accepting the vague diagnosis that the chimney ‘needs sealing.’
Clues that point to flashing rather than an ordinary roof leak
Watermarks near the chimney chase, damp attic sheathing on the uphill side, and stains that worsen during wind-driven rain all justify a flashing inspection. They do not prove the flashing is at fault. A chimney cap, cracked crown, deteriorated mortar, or even condensation in a flue can produce moisture in a similar location. The water can run along framing before it reaches the ceiling, so the visible stain may be several feet from the entry point.
Track the weather rather than guessing from one storm. Does the stain darken only during heavy rain? Is it worse when wind blows toward the chimney? Does it appear after snow melts? Photograph the interior mark with the date, and inspect the attic only from a stable, safely accessible area. Do not climb a wet roof or step between ceiling joists. A roofer and, when masonry is suspect, a qualified chimney professional can investigate the two systems together.
What step flashing and counterflashing should do
Picture rain flowing down a roof slope toward a brick chimney. Water reaching the chimney side should meet a shingle-and-metal overlap that sends it back onto the exposed roof surface. Each step flashing piece must work with its corresponding shingle course. A long strip simply nailed over the shingles is not an equivalent substitute for correctly integrated step flashing.
Counterflashing provides the second protective layer. It covers the top edge of the step pieces while allowing the roof and masonry to move separately. GAF’s steep-slope installation field guide illustrates the chimney-side sequence and metal overlaps used in its roofing system. The exact installation should follow the selected roof system and local requirements. When you review photographs from a contractor, look for a continuous, sensible drainage path rather than a shiny strip of metal that merely hides the joint.
The uphill side is where debris can quietly cause trouble
The back of a chimney is easy to overlook from the ground. Leaves, needles, and small branches collect there, especially when the chimney interrupts a long roof slope. Debris slows drainage, holds moisture against the joint, and can hide deteriorated metal or shingles. Even a well-installed flashing system deserves periodic visual attention when trees overhang the roof.
A roof cricket is a small peaked structure behind a chimney that divides water around its sides. Not every chimney needs the same design, and requirements depend on chimney width, roof slope, local code, and the roofing system. GAF’s explanation of what a roof cricket does helps explain why runoff management matters. Ask whether the back pan is correctly pitched, whether water is ponding, and whether debris has created a temporary dam. A leak that returns each fall may be partly a maintenance problem, but damaged flashing still needs proper repair.
A careful inspection starts with evidence, not a hose
A contractor should first review the ceiling stain, attic conditions, chimney masonry, and roof surfaces together. A close look at the step flashing, counterflashing, apron, and uphill back pan may reveal loose fasteners, corrosion, open seams, or metal that has pulled away from the brick. Crumbling mortar at a reglet can matter just as much as a split shingle.
Some leaks need controlled water testing, but flooding the roof with a garden hose can confuse the diagnosis and push water into areas that would not normally get wet. Ask the roofer to explain the testing sequence and to protect interior finishes. If several components are suspect, photographs before removal and after each repair stage make the work easier to evaluate. For a related look at drainage paths, our guide to roof valley leaks shows why the point where water concentrates deserves more attention than the stain below it.
Repair choices: reseal, replace pieces, or rebuild the junction
A small, accessible defect in otherwise sound counterflashing may allow a targeted repair. That is different from smearing sealant over a broad failing joint. When step flashing is missing, rusted, punctured, or installed over rather than under the correct shingle layers, sections of roofing may need to come up so the metal can be replaced in sequence. If masonry is loose, repointing or a properly formed counterflashing reglet may be part of the job.
A chimney flashing leak that has soaked the roof deck can require replacement of damaged wood as well. Ask whether the quote includes inspection of concealed decking after shingles are lifted, and how any unforeseen damage will be priced. A contractor who proposes only a tube of caulk for recurring water intrusion should explain why the underlying metal and masonry are still sound. A durable repair restores the drainage layers instead of depending on a surface coating alone.
How to compare two estimates without comparing only price
Two proposals can use the same phrase—’repair chimney flashing’—and describe very different work. One may replace the apron only; another may remove shingles on all four sides, install new step flashing, integrate counterflashing into sound masonry, and rebuild the uphill water diverter. Request an itemized scope that names the affected sides, metal material, shingle replacement, masonry work, and debris removal.
Also ask who is responsible for interior damage, how the crew will protect the roof during an unexpected storm, and whether photographs of concealed conditions are included. If your roof is nearing replacement, a temporary patch may be economically different from a complete rebuild done during reroofing. The right choice is not automatically the most expensive option; it is the one that addresses the demonstrated entry point and avoids paying twice to open the same area.
A real-world example: a stain that returns after every windy storm
Consider a two-story house with a brick chimney halfway down the rear roof slope. The ceiling develops a small stain in spring, dries through summer, and darkens again after a windy October storm. A roofer finds loose counterflashing along the windward side and leaf buildup behind the chimney. The homeowner previously paid for sealant along the front apron, which never addressed the problem.
In this situation, the repair conversation should focus on the failed side joint and drainage at the uphill back, not automatically on replacing the whole roof. The crew may need to remove adjacent shingles, inspect step pieces, secure appropriate counterflashing, and clear the back area. If the roof deck is soft, that changes the scope. The example illustrates why a good diagnosis separates the location of the stain from the location where water enters.
What you can do safely between storms
From the ground, use binoculars or a zoomed photograph to note displaced metal, debris piles, or missing shingles. Inside, mark the edge of a ceiling stain lightly in pencil and check whether it grows after the next rainfall. Move valuables away from active drips, protect flooring, and contact a professional promptly if water reaches electrical fixtures or the ceiling sags. Do not open a ceiling cavity or disturb electrical wiring to chase a leak.
Keep gutters clear where they can be serviced safely, trim branches through an appropriate professional, and include the chimney junction in regular roof inspections. If you have already noticed trouble at another roof penetration, compare the signs in our roof pipe boot leak guide. The materials differ, but the lesson is similar: a water-resistant roof relies on integrated details, not an isolated bead of sealant.
Final thoughts
A chimney flashing leak is often fixable without replacing every shingle on the roof, but it deserves more than a cosmetic patch. The most useful question for a roofer is simple: which layer allowed water through, and how will the repair restore the path that carries rain back outside? When the answer includes photographs, a specific scope, and attention to masonry and uphill drainage, you can make a more confident decision. Catching the problem early may also keep a small flashing defect from becoming a larger decking or ceiling repair.
