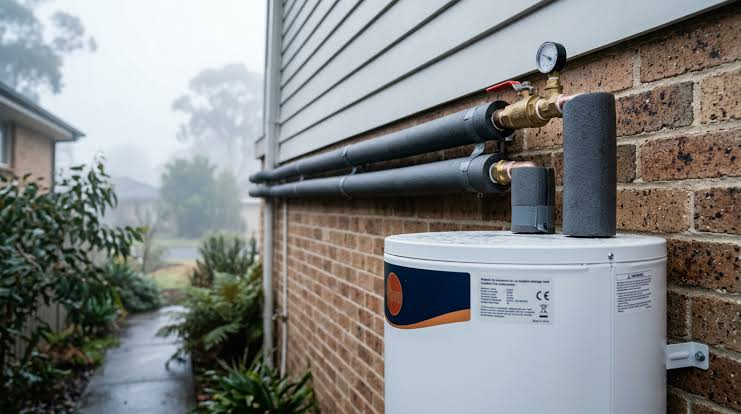
Hot water pipe insulation is a sleeve or wrap placed around accessible hot-water lines to reduce heat lost between the water heater and the faucet. It is a practical upgrade in basements, utility rooms, and other accessible spaces. The biggest benefit comes from covering the right pipes continuously and keeping the material away from unsafe heat sources.
A bathroom tap that takes a while to warm up may make you wonder whether wrapping the pipes will solve the wait. Insulation helps water stay warmer as it travels and cools between uses, but it cannot shorten an unnecessarily long plumbing route or fix a failing heater.
This guide walks through where to start, what to measure, how to handle bends, and when the job belongs to a professional.
What Insulation Can and Cannot Change
Uninsulated hot-water lines release heat into the surrounding air. That loss is especially noticeable in a chilly basement or garage. A correctly fitted sleeve slows the cooling of water sitting in the pipe and reduces heat loss while water is flowing. The result can be a modest energy benefit and less temperature drop before the water reaches a fixture.
The U.S. Department of Energy’s Building Science Education resource explains that insulating supply lines reduces distribution losses. The size of the savings depends on climate, pipe length, use patterns, and the insulation installed. A home with a short pipe run may notice less change than one with long exposed lines.
Hot water pipe insulation is not a cure for a water heater that is undersized, set incorrectly, or struggling with sediment. Nor will it eliminate all waiting time at a faraway bathroom. Think of it as improving the route that hot water already takes, not changing how far the water must travel.
Map the Run Before Installing Hot Water Pipe Insulation
Locate the water heater and identify accessible hot-water pipes. In many homes the hot line leaves the heater and branches toward bathrooms, laundry, and the kitchen. Follow it visually without moving electrical wiring, disturbing insulation of unknown age, or opening finished walls. Take a photo before buying material so you remember valves and fittings.
Prioritize exposed lengths in unconditioned spaces and the first accessible run leaving the heater. A pipe hidden behind drywall may be expensive to reach and is usually not worth opening a finished wall solely for this upgrade. Pipes already inside a warm, well-insulated room may have less to gain than those in a cold basement.
Some hot-water systems have recirculation loops that keep water moving through a return line. These systems can lose heat over a longer period because the water circulates frequently. Ask a plumber to identify supply and return lines if you are unsure. Covering the correct loop matters more than buying the thickest material without a plan.
Measure the Pipe, Not Just the Space Around It
Pipe insulation sleeves are sold by their inside diameter and wall thickness. Measure the outside diameter of the pipe, or use a reliable pipe-sizing reference if the line is labeled. Copper, PEX, and other materials may be described by nominal sizes that differ from the measurement across the outside. A sleeve that is too large leaves an air gap and can sag.
Measure the total accessible length, then add a little for corners and mistakes. Note how many elbows, tees, hangers, and valves interrupt the run. Straight lengths are simple, but a project can stall at the first tight turn if you have not planned the cuts. Bring your measurements when comparing sleeve types.
Before fitting anything, check the pipe surface for dampness, corrosion, or active leaks. A slow drip hidden under a new foam sleeve may continue unnoticed. Repair water problems first, then let the pipe and surrounding area dry. Insulation should never be used to conceal an uncertain plumbing condition.
Choose Hot Water Pipe Insulation That Fits the Location
Flexible foam sleeves are convenient for accessible residential lines because they are easy to cut and wrap around a pipe. Other materials are available for higher temperatures or specialized locations. Check the manufacturer’s stated temperature rating, indoor-use instructions, and fire requirements instead of assuming every sleeve is suitable beside every appliance.
Pay attention to thickness as well as diameter. Thicker material can reduce heat loss more effectively, but it may not fit through tight joist bays or around crowded valves. A sleeve that can be installed neatly and continuously is usually a better choice than an oversized product left open at every bend.
Protect insulation in areas where stored boxes, pets, or routine maintenance may damage it. Keep labels on accessible valves and avoid wrapping components that the appliance manual says must remain exposed. If a pipe runs close to a flue, burner, or other hot surface, stop and check the required clearances with a qualified installer.
Fit Hot Water Pipe Insulation Without Leaving Gaps
Turn off or avoid using hot water long enough for the exposed pipe to cool before handling it. Clean dust from the surface and dry it. Open the sleeve along its slit, seat it fully around the pipe, and close the seam as the product directs. Work along the line rather than installing random short pieces in different rooms.
Join neighboring sections tightly so there is no bare ring of pipe between them. Use the tape or adhesive approved for that insulation, not whatever happens to be in the garage. A loose seam can reopen as the sleeve moves with normal temperature changes. Inspect the underside as carefully as the visible top.
The Department of Energy’s domestic hot-water pipe insulation job aid shows why continuous coverage and careful fitting matter. It also addresses clearance near combustion equipment. Follow the current appliance instructions and local requirements whenever a pipe approaches a water heater vent or another heat source.
Make Elbows and Branches Work as Well as Straight Runs
At a ninety-degree bend, a straight sleeve may spring open or leave a triangular gap. Cutting two ends at matching angles can create a cleaner joint. Dry-fit the pieces before taping them. If the bend is crowded, several shorter pieces may follow the shape better than one forced section.
Tee connections need a little patience. Cut a neat opening for the branch so the insulation around the main run stays closed. Do not compress the sleeve so tightly that it pulls away from the pipe at the junction. Small exposed spots add up when the system has many fittings.
Valves and unions should remain identifiable and serviceable. You may need a removable insulation detail around a valve body rather than a permanently sealed wrap. If the fitting shows signs of leakage or requires frequent attention, leave the area accessible until a plumber has checked it.
Think About Cold Pipes and Condensation Separately
Cold-water lines may sweat in a humid basement when moist air touches a cool pipe. That is a different reason to insulate than reducing heat loss from hot water. If condensation is the issue, the material and seam closure must be suitable for vapor control, and room humidity may also need attention.
Do not assume every wet patch on a cold line is harmless condensation. Check whether moisture appears when the water is running, whether one fitting stays wet, and whether there is corrosion or staining below. A leak needs a repair; a sleeve placed over it can hide the evidence.
Where pipes pass through exterior walls, the surrounding air seal and wall insulation matter as well. Hot water pipe insulation can help, but a draft blowing through an unsealed cavity still wastes energy. If a wall must be opened for another project, ask how pipe placement, insulation, and air sealing can be improved together.
What Results to Expect From Hot Water Pipe Insulation
Take note of how long a familiar faucet takes to reach a comfortable temperature before and after the project, using similar starting conditions. Results vary because water already cooled in the line must still be pushed out. You may notice a smaller temperature drop during use or warmer water after a short pause.
A modest reduction in heat loss is worthwhile, but avoid promises of dramatic bill savings from a few feet of sleeve. Heating costs depend on the heater, fuel, hot-water habits, and pipe layout. A useful way to judge the upgrade is that it is relatively simple when the pipes are accessible and the work is done correctly.
Pair the project with other practical efficiency improvements. Our guide to attic hatch insulation covers a separate source of unwanted heat movement, while basement rim joist insulation explains why air sealing matters in the lower part of a house. Each project addresses a different weak point.
When Hot Water Pipe Insulation Needs a Contractor
Call a professional if you find active leaks, damaged piping, questionable gas-appliance vent clearances, or unfamiliar recirculation equipment. Do not move a water heater flue or disconnect plumbing to make a sleeve fit. Those tasks can affect safety and appliance operation.
A contractor can also help when pipes run through inaccessible cavities or when a renovation offers the chance to improve the whole hot-water distribution route. The best long-term solution may involve shorter runs or a different layout, not simply more insulation.
Ask for a scope that lists which lines will be insulated, the material and thickness, how bends and valves will be handled, and what will remain accessible for service. Clear details make it easier to compare quotes and avoid paying for material that is installed poorly.
Final Thoughts
Hot water pipe insulation works best when treated as a careful finishing detail for the plumbing system. The small decisions about fit, continuity, and clearance matter more than the color or brand of the sleeve.
Start with accessible, exposed hot-water lines, leave uncertain or hazardous areas to a professional, and judge the result by comfort and reduced heat loss rather than a promise that every faucet will become instant.
