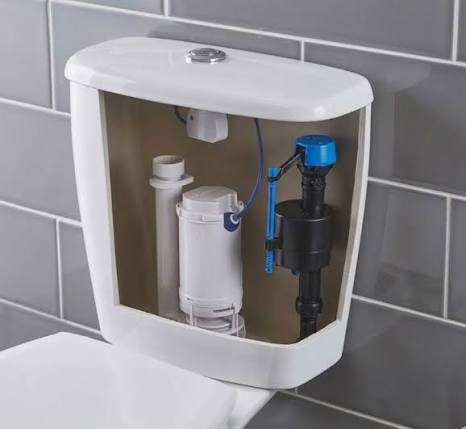
You flush the toilet, wash your hands, and hear the tank still filling long after it should be quiet. Sometimes a jiggle of the handle stops it. Other times the sound returns in the middle of the night. When a toilet keeps running after flush, the cause is often a small part inside the tank, but replacing random pieces can waste time and money.
Listen for the difference between two problems
A tank that refills every few minutes without being flushed may be losing water into the bowl through a flapper or flush-valve seal. A tank that hisses continuously while water runs into the overflow tube may have a fill-valve or water-level issue. Both can sound like the same leak from the hallway. Lift the tank lid carefully and set it flat on a stable surface before inspecting anything.
Do not put your hand near electrical devices or use chemical drain cleaners in the tank. Most ordinary gravity toilets have visible mechanical parts, but designs vary. Take a photograph before moving the chain or float. If the tank is cracked, water is leaking onto the floor, or the shutoff valve will not work, stop and call a plumber.
Use a simple dye test
The EPA WaterSense Fix a Leak Week guidance
If the bowl stays clear, watch the tank water level and overflow tube. Water spilling into that tube points toward the fill valve or its adjustment. If the handle sticks, the flapper may not be settling back onto its seat. A toilet keeps running after flush for several reasons, and the observation should guide which part you touch.
Check the chain before replacing the flapper
A chain pulled too tight can hold the flapper slightly open. A chain with excessive slack may catch under the seal. Adjust it according to the toilet manufacturer’s instructions so the flapper can lift fully and close without interference. Check for a handle arm rubbing against the tank or another component. Make one small adjustment, flush, and listen again.
A flapper that is warped, stiff, or covered in deposits may no longer seal. Match the replacement to the toilet’s flush-valve size and model. Fluidmaster’s flapper guidance
Look at the fill valve and water level
If water flows over the overflow tube, the float or fill valve may be failing to shut off at the correct level. Some valves have an adjustment screw or clip; others use a different mechanism. Follow the instructions for your exact model. Never force a brittle plastic part, and do not raise the water above the intended level just to improve the flush.
The site’s under-sink cabinet organization guideoutdoor faucet maintenance guide
Watch what happens during a complete flush
Remove the tank lid carefully and place it on a folded towel on the floor. Flush once while watching the parts move. The handle lifts a chain or linkage, the flapper opens, water leaves the tank, and the flapper should settle back onto its seat. The fill valve then replaces the water and stops. A toilet keeps running after flush when one part of that sequence fails or when water escapes from the tank after it has filled.
If the flapper stays open, look for a chain that is too tight, twisted, or trapped beneath the seal. If it closes but the tank refills again a few minutes later, the seal may be leaking slowly. If water never stops pouring into the overflow tube, the fill valve or water level is the stronger suspect. These observations are more useful than replacing the first inexpensive part you see at the hardware store.
Understand the dye test without misreading it
The food-coloring test works best after the tank has finished filling. Add a few drops to the tank water, leave the toilet unused, and check the bowl after about ten minutes. Color appearing in the bowl means water is passing from the tank to the bowl. Flush afterward to avoid staining. If the color stays in the tank, the test has not shown a flapper leak, though another problem may still be present.
Do not put dye into the bowl and expect the same result. The test is meant to show whether colored tank water moves past a seal. Also avoid testing while someone is using another fixture that changes the sound of nearby pipes; it can make diagnosis confusing. If you are unsure what you are seeing, a plumber can confirm the leak path without replacing the entire toilet.
Small chain adjustments can make a big difference
A flapper needs enough chain slack to close completely, but not so much that the chain catches under its edge. Look for a kinked link, a chain wrapped around the handle arm, or a handle that sticks after being released. Adjust one thing at a time and flush again. If the handle needs a hard push or does not return smoothly, the trip lever may be part of the problem.
Never force old plastic parts or bend metal arms aggressively. A brittle component can break and turn a minor nuisance into an urgent repair. If you have a dual-flush or concealed-cistern toilet, the mechanism may be different from the familiar flapper-and-chain design. Find the model information and use the appropriate service instructions instead of assuming the same adjustment applies.
Replace a flapper only when it is the right part
A flapper may become warped, stiff, or rough along its sealing edge. Deposits on the flush-valve seat can also keep it from closing cleanly. With the water shut off and the tank drained according to the manufacturer’s instructions, a compatible replacement may be straightforward for a confident homeowner. The important word is compatible. Standard-looking toilets can use different valve sizes and proprietary seals.
Take the old part or a clear photo of the model label when shopping. Check the flush-valve opening and the attachment method rather than relying only on package claims. Avoid dropping harsh chemical cleaning tablets into the tank; some can damage rubber and plastic components. After installation, turn the water back on, flush several times, and repeat the dye test to confirm the seal is working.
If the new flapper still leaks, inspect the seating surface and chain alignment. A replacement cannot seal against a damaged or badly worn valve seat. Do not keep buying flappers hoping one will solve a crack or a mismatched mechanism. At that point, a plumber can assess whether a flush-valve repair is needed.
A running fill valve sounds different
If the water level rises to the overflow tube and continues flowing, the fill valve is not shutting off as intended. Check whether the float moves freely and whether the valve’s adjustment follows the manufacturer’s directions. Sediment may interfere with some valves, but cleaning procedures vary. Do not dismantle a pressurized valve without shutting off the supply and following the correct instructions.
The refill tube also needs to be positioned correctly. On many gravity toilets, it directs water toward the overflow tube to refill the bowl, but it should not be pushed so far down that it creates an unintended siphon. Follow the toilet or valve maker’s diagram. A tube in the wrong position can cause confusing water movement even when the rest of the mechanism looks intact.
If the toilet keeps running after flush despite a correctly adjusted water level, the fill valve may need replacement. Before buying one, confirm the toilet type and tank height. Some replacements require a particular clearance or connection. A professional is the safer choice when the supply valve is seized, the tank bolts are corroded, or the toilet has an unfamiliar mechanism.
Check for leaks outside the tank too
A running sound does not always mean water is leaking only into the bowl. Look for moisture around the supply connection, shutoff valve, and floor. A slow drip at the base or supply line is a different repair from a worn flapper. Dry the accessible area and check again with a paper towel. If you see active leaking, close the supply if it operates normally and call a plumber if the connection is damaged.
Do not overtighten old fittings in an attempt to stop a drip. Porcelain can crack, and plastic threads can strip. If the floor feels soft or the toilet rocks, the issue may involve the wax seal, mounting, or damaged flooring. Those conditions deserve attention even if the tank eventually stops running. A quiet toilet with a wet floor is not a successful repair.
An example that avoids unnecessary parts
Imagine the toilet in a guest bathroom refills for ten seconds every half hour. The water level looks normal, but dye appears in the bowl after ten minutes. The likely next checks are the flapper, chain, and sealing surface. Replacing the fill valve first would not address the water escaping through the bottom of the tank. A simple observation prevents a detour.
Now imagine the main bathroom toilet hisses continuously and water spills into the overflow tube. Dye does not show a slow leak past the flapper. In that case, checking the float and fill valve makes more sense. The two toilets sound similar from the hallway but need different attention. That is why diagnosis comes before shopping.
Know when to stop the DIY repair
A shutoff valve that will not close is a reason to stop rather than force it. So is a cracked tank, leaking supply line, damaged flooring, or a toilet that uses a complicated concealed mechanism. If you are renting, follow the property’s repair process before replacing parts. Keep photographs and notes about the symptom so the maintenance person can find it quickly.
If a simple adjustment works, check the toilet again the next day and after several flushes. A chain can catch intermittently, and a worn seal may leak only sometimes. The repair is complete when the tank fills, stops, and stays quiet without water escaping into the bowl or onto the floor.
Final thoughts
When a toilet keeps running after flush, the most useful tool is careful observation. Watch the flush cycle, use the dye test, identify whether the flapper or fill valve is responsible, and choose the smallest suitable repair. The goal is not to replace every component inside the tank. It is to restore a reliable seal and stop wasting water without creating a new leak.
