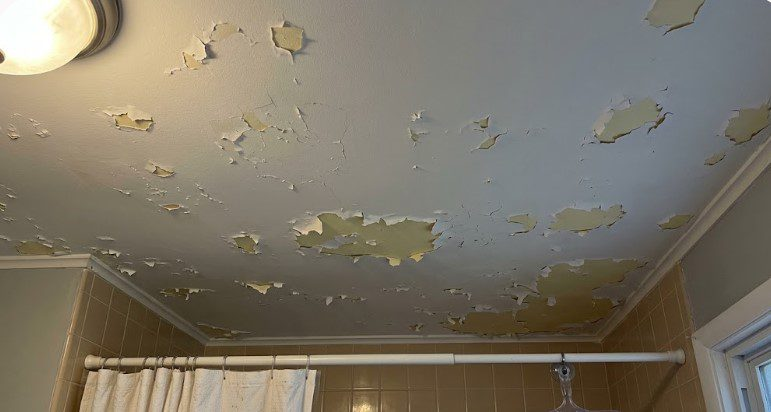
Peeling bathroom paint usually means the coating has lost its grip because of moisture, poor surface preparation, or an incompatible older finish. The lasting fix is to identify why the wall stays damp, remove loose material safely, prepare a sound surface, and use the right primer and paint. A fresh coat over a flaking patch rarely solves the problem.
The first loose curl of paint above a shower can look like a small cosmetic annoyance. After another winter of hot showers, that same patch may spread across the ceiling. Repairing the finish without changing the conditions behind it is an easy way to repeat the job.
Here is how to separate steam problems from leaks, plan a safe repair, and decide when a damaged wall needs more than paint.
Read the Pattern of Peeling Bathroom Paint
Paint peeling across the ceiling above a shower often points toward repeated moisture exposure or poor adhesion. Damage concentrated around one corner, window, or pipe chase may suggest a leak or cold surface where condensation collects. A patch that grows after a storm could even involve water entering from outside.
Touch the area only when it is safe and dry. Soft drywall, persistent staining, or a musty smell may indicate that the substrate has been wet for some time. If the ceiling bows or water is near a light fixture, keep the area clear and call the appropriate professional before doing any surface work.
Photograph the patch and note when it worsens. Does it happen after long showers, during humid weather, or while the bathroom sits unused? This simple record can prevent you from sanding and painting a spot that will become wet again the next week.
Steam, Condensation, and Hidden Leaks Are Different Problems
Warm shower air carries moisture that can settle on cooler ceilings and walls. If the bathroom lacks effective exhaust, damp surfaces may take too long to dry. A working fan should move moist air outdoors through the intended duct, not into an attic or wall cavity.
A plumbing leak can keep one section wet even when the bathroom is not in use. Watch for swelling near a supply pipe, grout line, shower surround, or upstairs fixture. Water can travel along framing before reaching the painted surface, so the visible peeling may be some distance from the source.
Before repairing peeling bathroom paint, confirm whether the area can dry between uses. Our guide to bathroom exhaust fan venting explains why duct termination matters. A better paint product cannot compensate for an exhaust system that deposits moisture back into the building.
Check the Age of the Home Before Disturbing Old Paint
Paint removal creates dust and chips. In homes built before 1978, older coatings may contain lead. The risk is not limited to a child’s bedroom; a bathroom wall or trim can also hold old layers beneath newer paint. Do not dry-sand or aggressively scrape an unknown older coating without understanding the hazard.
The U.S. Environmental Protection Agency’s renovation and painting guidance explains why disturbing lead-based paint requires care. Paid contractors working on many pre-1978 homes must follow applicable lead-safe rules. Homeowners should consider a lead-safe certified professional for uncertain surfaces.
If the home is newer and the coating is known to be lead-free, ordinary surface preparation may be appropriate. Even then, wear suitable eye protection and follow product instructions. Keep children and pets out of the work area, contain chips, and clean thoroughly rather than allowing dust to spread through the house.
Remove Only What Has Lost Its Grip
Once the moisture source is controlled and the wall is dry, gently test the edge of the peeling area. Loose flakes must come off, but firmly bonded paint does not need to be stripped from the entire room. Work back to a sound edge without gouging the drywall paper or plaster beneath.
Feather the edge using a method appropriate to the surface and paint age. A raised ridge can show through new paint, especially on a ceiling where side lighting emphasizes texture. If the drywall paper tears or the plaster crumbles, repair the substrate before reaching for primer.
Do not hide loose paint under thick joint compound. The patch may look smooth for a few weeks, then fail when the weak coating beneath it lets go. The goal is a stable base, not the quickest way to make the wall look flat for a photograph.
Dry and Repair the Wall Before Sealing It
Let the area dry thoroughly after any leak repair. A wall can feel dry on the surface while the material behind it remains damp. If moisture is persistent or the drywall is soft, ask a professional to assess whether part of the board needs replacement. Paint and primer are not drying equipment.
Clean away soap residue, dust, and other contamination with a method suitable for the wall material. Rinse or wipe as directed and allow the surface to dry. In a busy family bathroom, schedule the work when the shower can remain unused for the period required by the repair products.
Sherwin-Williams’ guidance on interior moisture-related peeling emphasizes controlling humidity before removing loose paint and priming. That order matters. Skipping the moisture fix can make even an expensive finish fail again.
Pick Primer for the Actual Surface
Primer is not a magic barrier against ongoing leaks. Its job is to help the new finish bond to the repaired surface and, when appropriate, seal porous patches or stains. A previously painted ceiling with small drywall repairs may need a different primer than glossy trim or a heavily stained surface.
Read the label for bathroom suitability, drying time, ventilation requirements, and compatibility with the chosen topcoat. If the product requires a fully dry surface, do not rush because the patch looks ready. Damp compound or trapped moisture can weaken the bond beneath the new paint.
Use a test patch when the existing finish is uncertain. If new paint lifts or wrinkles during testing, stop and investigate compatibility rather than coating the entire ceiling. A little extra preparation now is easier than stripping another failed layer later.
Choose a Bathroom Finish for the Way the Room Is Used
A bathroom used for quick handwashing has different moisture demands from a small family bath with daily hot showers. Choose a quality coating rated for the location and follow the manufacturer’s recommendations. Finish sheen affects how marks and wall imperfections appear, but no sheen makes a persistent leak harmless.
Ventilate the room as the product label requires while painting and drying. Do not rely on a shower fan to remove all paint fumes unless the manufacturer says that ventilation method is appropriate. Keep the room out of service until the coating has dried and cured enough for normal moisture exposure.
Apply the recommended number of thin, even coats. Heavy paint can run on ceilings and may dry unevenly. Maintain a wet edge where practical and avoid overworking partially dried sections. The best result is a durable finish over a sound, dry base, not the thickest possible layer.
Improve the Bathroom Routine That Caused the Damage
Run the exhaust fan during showers and long enough afterward to remove lingering humidity, following the fan manufacturer’s guidance. Keep the bathroom door open when practical after use so the room can dry. Wipe persistent condensation from windows and other cold surfaces.
Clean the fan grille and check that the fan actually moves air. A noisy fan is not proof of effective ventilation. If mirrors remain wet for a long time or moisture collects in the attic, have the fan and duct checked. The goal is to get humid air outdoors rather than simply moving it around the house.
Also inspect worn caulk around the shower and tub. Our guide to a showerhead that drips when off covers a different water issue, but the lesson is similar: identify the source before replacing visible finishes or parts.
When the Job Is Bigger Than a Weekend Patch
Large areas of soft drywall, repeated staining, visible mold growth, or a persistent musty odor deserve professional assessment. A painter may be able to restore the finish, but a plumber, roofer, or moisture specialist may be needed first. Do not let a cosmetic quote substitute for diagnosing the building problem.
Request a scope that separates moisture correction, damaged material removal, patching, priming, and painting. Ask which parts of the wall or ceiling will be replaced and how the contractor will verify the area is dry. Clear steps make it easier to compare bids and understand what is actually being repaired.
If peeling bathroom paint returns quickly after a careful repaint, reconsider the cause rather than changing paint brands again. The bathroom may have an unresolved leak, inadequate ventilation, or a surface that was not fully prepared. A second diagnosis is usually more useful than a second hurried coat.
Final Thoughts
Peeling bathroom paint is often the visible end of a moisture story. A clean, smooth finish is worth having, but the real improvement is a room that can dry after everyday use.
Fix the water source, protect yourself during preparation, and give each layer the time it needs. Then the paint can do the job it was designed to do.

Nike Carkarel
Nike Carkarel writes about home decor, interior design, and practical ways to make living spaces more beautiful and comfortable. At Turquoise Moon Homes, Nike shares ideas for decorating rooms, choosing furniture, improving home layouts, and making everyday spaces work better. With an interest in thoughtful design and simple home improvements, Nike helps readers find inspiration for homes that feel welcoming, stylish, and easy to live in.